Categories
FAQ Instruction

Are My Emails Compliant with Amazon Policy?

Utilize this checklist to examine your account and modify your templates and campaigns to be in line with Amazon’s Communication Guidelines.

Amazon’s Communication Guidelines specify that you can always reply to a buyer’s inquiry or send necessary messages for order fulfillment. These might relate to customization queries, delivery scheduling, etc. You are also allowed to dispatch Proactive Permitted Messages for various purposes, such as soliciting a product review, seller feedback, or both. However, every message has to adhere to Amazon’s guidelines regarding content, format, timing, and more. (For a concise overview of these guidelines, view Amazon’s video).

Zonmaster provides numerous integrated features that assist in ensuring compliance. Nevertheless, you bear the responsibility to guarantee that the templates and campaigns you design adhere strictly to Amazon’s standards. Whenever you design or evaluate your templates, refer to the checklist below to ensure compliance. Actions that Zonmaster takes care of automatically are marked with checkmarks.

Tip: By using the official Amazon template (Request a Review), your messages are always 100% compliant! For a rapid and risk-free approach to ask for reviews and feedback, you can enable the default Feedback and Review Request that comes with the Amazon template.

Proactive Permitted Messages: MUST HAVES

  • Dispatch within 30 days post order finalization. Zonmaster will only dispatch emails within 30 days of the order’s delivery. Older orders are automatically excluded.
  • Incorporate the 17-digit order ID. Zonmaster templates include the order number by default.
  • Content should be in the buyer’s preferred language. Zonmaster campaigns that use a Buyer-Seller Messaging template offer two compliant options:
    1. Exclude buyers with a language preference different from the marketplace’s default (e.g., an English-preferred buyer on the French marketplace).
    2. Direct these buyers to the Amazon Request a Review template, which auto-translates to the buyer’s language.

⚠️ Proactive Permitted Messages: NOT ALLOWED

Prohibited ActionDetailZonmaster’s Feature/Recommendation
Repeat RequestsNo repetitive requests for reviews or feedbackProvides three default campaign options. Activate only one. Pro users can design custom campaigns without overlap.
ConfirmationsNo order or shipping confirmationsNot mentioned
Basic Thank You MessagesNo simple “Thank you” messagesNot mentioned
MarketingNo promotional content, including discount codesNot mentioned

⚠️ Email Content: NOT ALLOWED

Prohibited ContentDetailZonmaster’s Feature/Recommendation
Opt-out LinkNo link to opt out of communicationLacks this feature
Secure External LinksOnly secure links vital for order or Amazon linksScrutinize and test all links
Positive Review EncouragementNo incentives or persuasive language for positive reviewsCraft requests neutrally
Review Alteration RequestNo content requesting review changes or removalNo option to message reviewers
Non-essential AttachmentsAttachments only crucial for buyer’s issuesAudit all attachments
Website Link in LogosNo logos with website linksEvaluate all logos
Sensitive ContentNo sensitive images or textAssess all content
Tracking PixelsNo tracking pixels or graphicsExcludes this feature
Personal DetailsNo personal email addresses or phone numbersGuide buyers to reply for queries
Product ImagesAmazon provides product imagesTemplates lack product images by default
ErrorsNo spelling or grammar mistakesReview all messages for accuracy

⚠️ Email Styling: NOT ALLOWED

Prohibited StylingDetailZonmaster’s Feature/Recommendation
Emojis and GIFsNo emojis, GIFs, or irrelevant brand imagesNo support for emojis or GIFs. Ensure brand-appropriate images
Font VariationNo more than three font sizesMaintain uniform text size
Line BreaksNo excessive line breaksMinimal spacing between paragraphs
Insecure GraphicsGraphics must be secure (https)Image Library guarantees secure integration
ALT text for GraphicsGraphics must have ALT textImage Library includes ALT text automatically

In conclusion, ensuring email compliance with Amazon’s Communication Guidelines is crucial for sellers to maintain a harmonious relationship with both Amazon and their customers. While Amazon permits certain proactive messages and responses, there are explicit dos and don’ts to be aware of, especially concerning content and styling. Zonmaster, with its integrated features, simplifies the compliance process for sellers, although it’s essential for each seller to vigilantly review their templates and campaigns. By adhering to these guidelines, sellers can foster trust, avoid potential pitfalls, and create a smooth communication channel with their buyers. Ready to streamline your email process and ensure compliance? Join Zonmaster today and let us be your partner in success!

Categories
FAQ

Enhanced Feature Access: E. U. Marketplaces

Overview

Seller Central Integration (SCI) is a way for Zonmaster to connect to your Seller Central account to import key information.

Order imports, negative feedback imports and email sending use your MWS credentials and do not require SCI.

However, the following features do require Seller Central Integration:

  • Positive feedback imports
  • Excluding buyers who have already left positive seller feedback from your seller feedback requests.
  • Targeting buyers who have left positive feedback with specific campaigns.
  • Tracking MFN/FBM (Merchant Fulfilled) Orders for delivery notification.

To initiate SCI, you will invite Zonmaster to become a “secondary user” on your Seller Central account and then grant it user permissions to view positive feedback.

Add New Seller Central User

  1. Log in to Seller Central
  2. Hover over “Settings” then click “User Permissions” in the drop-down list.
  3. Scroll to the “Add a New Seller Central User” section, add the email address that you found on the Seller Central Integration page on Zonmaster and click “Send Invitation.”
  4. The invitation will be sent to Zonmaster to set up the new access.

Please be aware that it can take up to 24 hours for Zonmaster to accept your invitation.

Amazon Confirmation Email

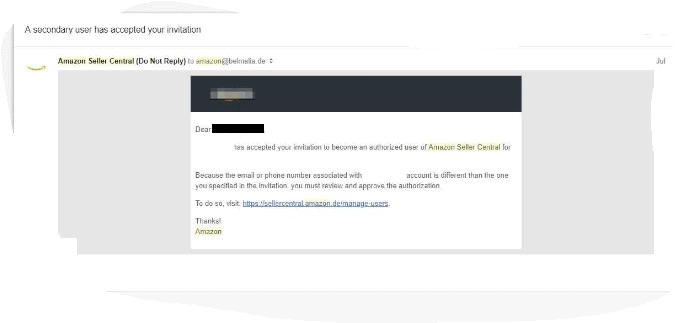
  1. Amazon will send you two emails to notify you that Zonmaster has accepted the invitation. First, you will receive the email below saying that you must “approve the authorization.” Please take no action until you receive the second email.

    If you click the link in the email, you will be asked to fill out the “Secondary User Information” form. This will be completed automatically within the day, so no action from you is required.

  2. Within 24 hours, you will receive a second email once Amazon has verified the new user’s “Secondary User Information”. The second email will look like this and tell you that you can now grant permissions:

  3. Simply click on “Click here” to proceed with granting permissions on Amazon. The link will take you back to the “User Permissions” page.

Manage Permissions

  1. In the “Current Users” list, find the Zonmaster email address and click “Manage Permissions.”

  2. Please follow the instructions on the Seller Central Integration page on Zonmaster as to what permissions need to be set.

  3. Click the “Continue” button at the bottom of the page. You will be notified that the new permissions have been modified successfully.

You’re Done!

You will begin to see positive feedback on the Feedback page within 48 hours.

Categories
FAQ Instruction

Getting Notified by Email and SMS When You’ve Got New Reviews and Feedback

On your store’s settings page, you can set up notifications that will tell you when reviews and or seller feedback have come in.

You can update some of these, and configure other settings, on your Amazon Store’s Settings page.

To get there go to the ‘Settings’ menu and select ‘Store Settings’ (or click here)

Then click on your store’s name.

The Settings

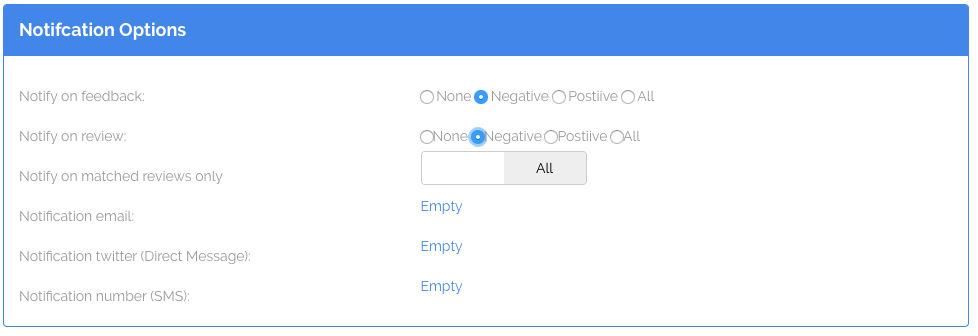
The optimal settings are these below:

You will get notified about negative Seller Feedback and products Reviews. Because Amazon is currently making it very difficult to match reviews to orders, we suggest setting the ‘notify on matched’ to ‘All’.

Then click on your email address or your SMS number (or Twitter name) and we will send you notifications.

Categories
FAQ Instruction

How to Edit the Settings of Your Amazon Store

When you signed up with Zonmaster you gave us your Amazon Seller info – Seller ID, MWS Auth Token, Send From email address etc.

You can update some of these, and configure other settings, on your Amazon Store’s Settings page.

To get there go to the ‘Settings’ menu and select ‘Store Settings’ (or click here)

Then click on your store’s name.

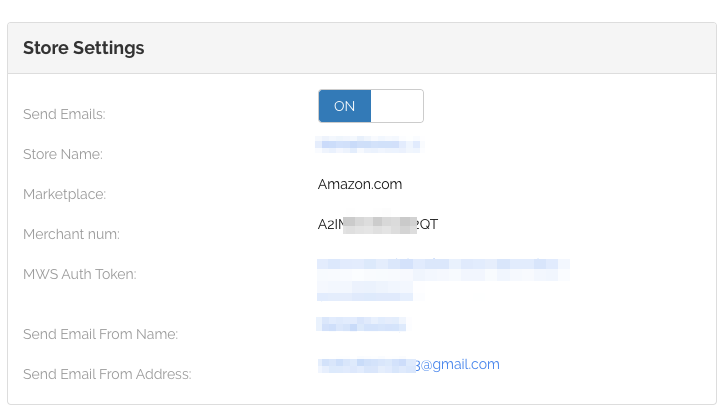
You’ll end up on a details page like this:

Editing Email Address

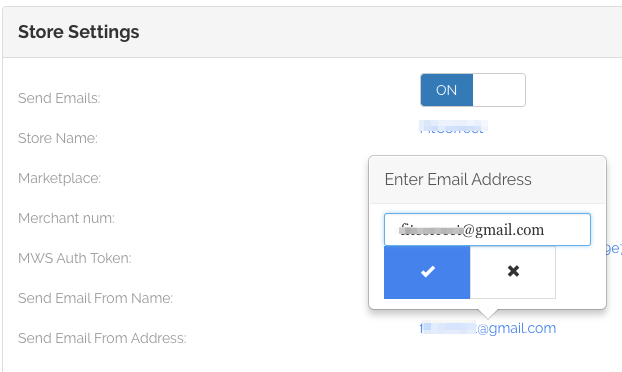
To edit your Send Email From Address click on it and a small popup window will appear where you can enter the new address.

PLEASE READ THE ‘About the ‘Send From’ Email Address’ section on that page before editing the address. If you change the email address to an email that is not authorized with Amazon your emails will be sent to Amazon but not to your customers and you will have credits removed from your Zonmaster account.

If your email address has not yet been verified by you with Zonmaster you can ‘resend’ the verification email to your address. The verification email will come from Amazon Web Services and you’ll have 24 hours in which to click the link.

Please note that it can take up to 30 minutes for the email to sync with us after you have verified it.

Refreshing the MWS Auth Token

Amazon expires the Auth Token once a year. They will send you an email warning you that it is coming to an end. When you renew the Auth Token the token MIGHT change, so please paste the new token into this page. Just like with the email address, you click on the Token text and a popup will appear. Once you have saved it a ‘Recheck’ button will appear and you MUST click on that to complete the update.

Categories
FAQ Instruction

How To “Force Send” To Old Orders

1) Start By Setting Dates

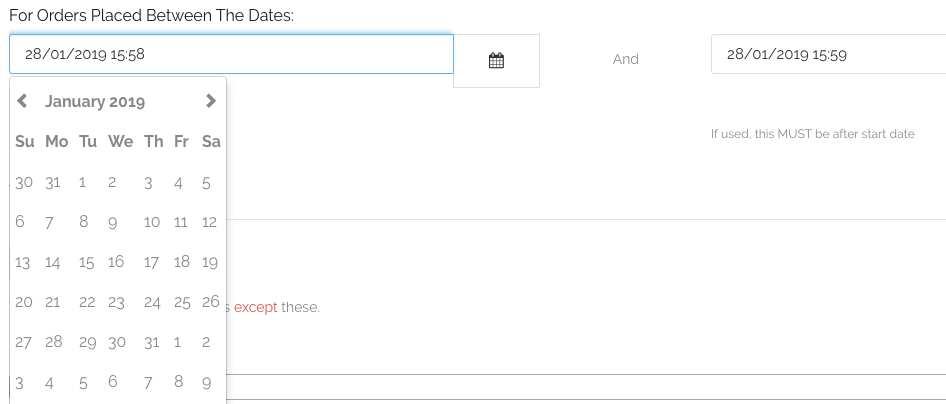
Technically you don’t HAVE to do this, but, it is strongly (x 1000) recommended. Edit your email template and go to the “For Orders Placed Between The Dates:” section under “When?”. Click in each field to show the date picker and choose a start and stop date.


(of course, you have to fill out the rest of the template. We’re just talking about the specifics needed for Force Send here)

2) Save Your Template

3) Scroll Down To “Force Send”

and click the “Send It” button (which doesn’t really send it, but takes you to a confirmation screen)

4) Read the Confirmation Screen

We will tell you the rules of who will get your email template. Read them carefully.

5) Type “AGREE” in the field

This is so that you have to pause and think!

6) Click “Schedule Emails”

This would queue up your emails

OR

Click “Get me out of here” to go back to the email template details page.

NOTES

  1. Don’t to ‘Force Send’ an “ASAP” triggered email. Results will be unpredictable.
  2. If you have an ‘end date’ make sure it is after the ‘start date’
  3. ‘Start Date’ and ‘End Date’ apply to ‘purchase date’ of an order
  4. We can only send to orders that are in our system. During your free trial, we only go back 5 weeks. After your free trial, we go back varying times depending on your subscription level.
Categories
FAQ Instruction

Inserting Images into Email Templates

Inline Images

You can upload and insert an image into your email by using the ‘Insert Image’ icon in the toolbar. Unfortunately, there are two of these! You need to use the rightmost one (if you hover over it it will say ‘Insert an image from your computer’).


Images from ShortCodes

There are also some image resources in our shortcodes. Things like product images should NOT be uploaded and manually inserted. Instead you should use the %%product_image_small%%%%product_image_medium%% or %%product_image_full%% (we strongly recommend small!) shortcode.

A Word About Images

Remember that images are not guaranteed to arrive to your customer. They may have images switched off on their email client or device. Images should be seen as SUPPLEMENTAL to the message of your email, not vital. This means ALL images – logos, products, buttons, clever memes, etc etc. Don’t depend on them.

Categories
Instruction FAQ

How to use ShortCodes in Email Templates

Why Use ShortCodes?

One of the things that makes a system like Zonmaster so powerful is that you don’t have to write an email for each and every product and customer. By using shortcodes you can substitute in things for the current order automatically. Back in the old days we used to call this ‘Mail Merge’. It adds great flexibility to te emails you can write.

ShortCode Format

All Zonmaster shortcodes take the form of %%short_code%%. The shortcode is the whole thing – from the opening %% to the closing %%.

In some shortcodes – like %%review_link%% – you can enter in your own text. So, the shortcode looks like this: %%review_link:your text here%%. What that means is that after the shortcode name (in this case, review_link) there is a colon (:) and then you can write your own text. So you can have %%review_link:click here to leave a review%%. Try to avoid using punctuation inside your text (sorry about that. We’re working on it)

DO NOT style the text in a shortcode. i.e. DO NOT bold, italicize, color etc etc a shortcode tag.

Common Codes

Customer Name

To personalize your emails to the customer, Zonmaster offers a range of ‘buyer related’ shortcodes. For example, to use the buyers first name in a greeting you can write

Hi %%buyer_first_name%%

and in the resulting email that will come out as

Hi Bob

(assuming their name is Bob of course!)

Product Name

We always always always recommend that you use the %%product_nick%% shortcode when you want to include the name of what the customer ordered in an email. This way, if you’ve created a nickname (a shortened or different name for a product) it will substitute that.

Thank you for buying %%product_nick%%

Will result in

Thank you for buying World’s Best Widget

Store Logo

If you uploaded your store logo to your Amazon Store’s settings page on Zonmaster then you can include that in any email by using %%store_logo_small% (or medium or full).

Thanks again!

Bob from My Store

%%store_logo_small%%

Will result in

Thanks again!

Bob from My Store

All Zonmaster ShortCodes

You can find a full list here (always available under the ‘Emails’ menu as ‘Email Variables Help‘)

Categories
News FAQ

Yes – we’re GDPR Compliant!

We decided NOT to spam you with this, but, we are getting some requests.

Zonmaster has updated the Terms and Conditions and Privacy Policy to hilight that we are GDPR compliant. Your data – and the data of your customers – is stored in an encrypted format in our database. We have processes in place to delete data upon request.

The gathering of your customer’s data from Amazon is covered by Amazon’s “contract” with the customers (and your MWS contract with Amazon),

Happy selling!

Categories
FAQ News

All About the Amazon Opt-Out

Amazon.com, Inc. (“Amazon”) recently began blocking messages that are sent to buyers who have chosen to “opt out of unsolicited messages” from Amazon. Many sellers have come to us with questions, so we’re sharing our answers here.

What does it mean if a buyer “opts out of unsolicited messages?”

Buyers who have opted out of unsolicited messages will only receive emails with information that is critical to completing orders, including product customization questions, delivery scheduling or issues with a shipping address. As of March 31st, 2017, Amazon offers a way for customers to opt out via the emails and website.

What happens if I send emails to these buyers?

No penalty will be imposed for attempting to send an email to a buyer who has opted out of unsolicited emails. Amazon will simply block the message, and you will receive a notification that the buyer has opted out. Currently, this is the only way to identify buyers who have opted out.

What if I need to contact the buyer?

You can send messages to the opted-out buyers if you have information that is critical to completing orders. The messages should be sent directly from Buyer-Seller Messaging and the subject should be “Additional Information Required.” Sending non-critical information by this method could result in a penalty, including suspension of your seller privileges. Non-critical items include shipment confirmations, product manuals, out-of-stock notices, and feedback or product review requests.

How can I avoid sending additional emails to these buyers?

Forward the Amazon opt out notification email to the personalized email address available on your ZonMaster Dashboard. We suggest setting up an autoforward filter in your email (read more here). ZonMaster will add the buyer’s email address to the Amazon Opt Out list and never send them another email.

Can I identify buyers who have opted out of unsolicited messages?

Amazon does not currently provide this information to sellers in Seller Central or through their API. We’ll provide an update as soon as opt-out information becomes more widely available.

Please contact us if you have any questions.

Categories
FAQ

[FAQ] Why Aren’t My Emails Sending?

This is the #1 question we get and of course there are many possible reasons, but here’s the top 3 reasons we’ve seen.


1) Incorrect Sales Channel setting on the template.

On each template you can set which purchasing Sales Channel (i.e. Amazon website that the customer bought from) this template gets applied to. If you don’t select a Sales Channel it will never get sent, even if it is active.  Unless you have a specific reason not to, we suggest setting the Sales Channel to ‘All’. The only reasons not to are if you have other templates that send out to other channels. The way Amazon works, it is quite possible your Amazon.com product will get sold on Amazon.ca (Canada) or Amazon Mexico and in this case your email wouldn’t go out. (Same is definitely true of Amazon.co.uk as Amazon shares across Europe).

2) Incorrect ‘Send to Orders Placed After’

We added this feature to help you migrate from another auto-responder platform. If you are not migrating completely disregard this field. If you are migrating you can choose a cut off date. Note that the date is for orders PLACED after. So even if your template triggers on shipping, this applies to the order purchase date.

3) Items Not Added

The Way ZonMaster works is that it checks an order to see if it contains any of the items in your template. If you don’t add an item to your template, emails will never get sent to purchasers of that item. At the moment we don’t have a ‘Apply To All’ setting…you need to add all your items. Also, if you add new items to Amazon, you need to come back to us and add those items into your email template.