
Send To Amazon is a service that saves you time when you replenish your FBA inventory by letting your create reusable packing templates with information on how your SKUs are prepped, labeled and packed.
Once you create a packing template you can reuse it on shipment after shipment without having to re-enter the same details each time!
Send To Amazon Bullet Points
Send To Amazon is currently in beta, and may not yet support every feature that you have inside of shipping inventory to Amazon.
Here’s a few limitations/features to be aware of:
What it supports:
- One SKU per box (this is vital. If you can’t do this – like your supplier boxes multiple SKUs together – you cannot use STA)
- Small-parcel and pallet shipments
- Shipments via both Amazon Partnered and non-partnered carriers
What it doesn’t support:
- More than one SKU per box
How To Use Send To Amazon
After you’ve logged in to Seller Central go to the ‘Inventory’ menu at the top of the page and select ‘Manage FBA Shipments’
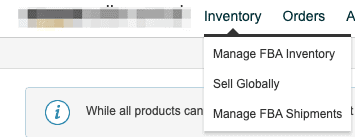
You should then see a ‘Send To Amazon’ link at the top of the page.

You can also get to Send To Amazon directly via this link
On the ‘Send To Amazon’ page you’ll see a list of all your FBA SKUs. If your SKUs are not yet FBA managed you’ll need to update those by going to the ‘Manage FBA Inventory’ area and switching your SKUs from ‘Merchant Fulfilled’ to ‘Fulfilled By Amazon’.
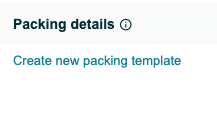
Create a Packing Template
First step is to actually create the packing template for the SKU you want to send to Amazon. Click the ‘Create Packing Template’ link next to the SKU you want to send.
The packing template saves information about how you prep, label and pack the SKU.
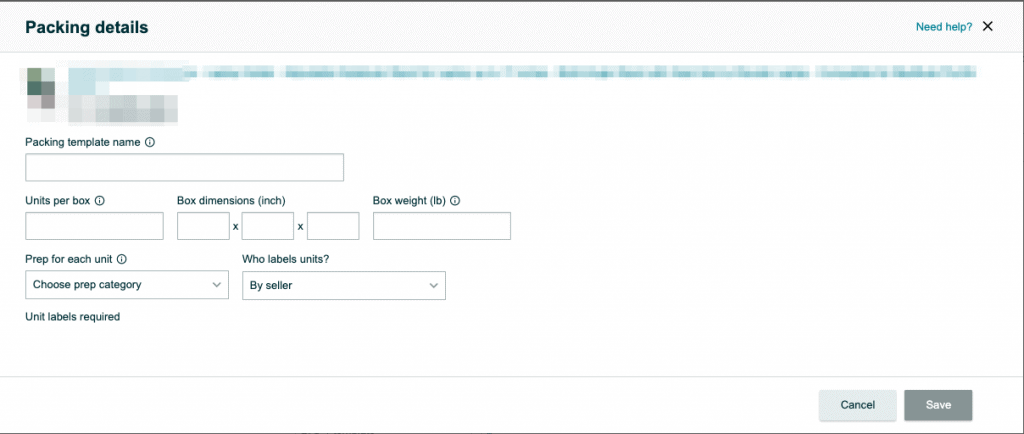
The field are:
- Template Name – give this template a relevant name. You can have up to 3 templates per SKU.
- Units per box – how many items will be in a box
- Box dimensions
- Box weight
- Prep per unit – many units require prep and labeling to be received correctly at the fulfillment centers. Any required prep and labeling must be applied to each sellable unit.
- Who labels? – Pay Amazon to do it, or you have done it
Print Labels
After saving your template you will be able to print off the labels by clicking the ‘Print SKU Labels’ link.

Create Additional Templates
Simply click the ‘New Packing Template’ in the Template dropdown.
Create a Shipment
1. Choose the Address
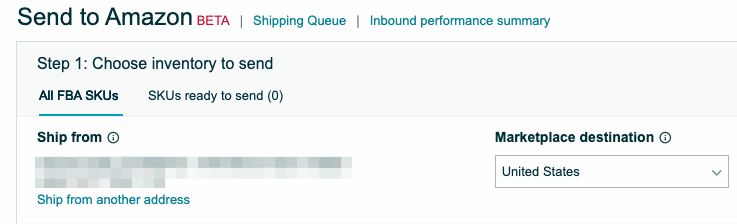
In the top left (called Step 1) choose the address you are shipping FROM. If no address is listed, click ‘Ship from Another Address’ and enter in the details.
2. Make sure you have the right packing template selected
3. Enter the number of boxes

It will automatically show you how many units (number of boxes x units per box) Amazon will expect to receive.
4. Confirm And Continue
Now you are taken to Step 2 – Confirming Shipping
5. Enter Expected Ship date
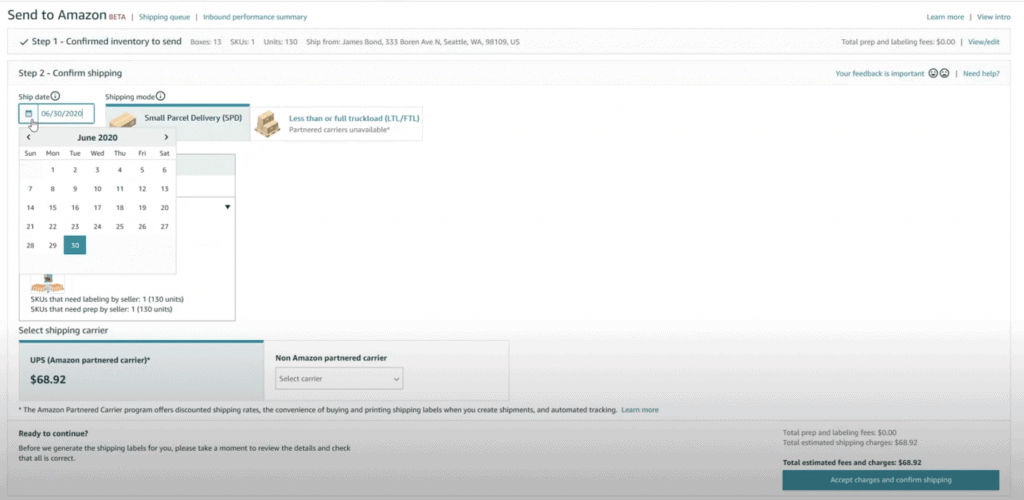
You can update this later, so give a ‘best guess’.
6. Choose How it is being shipped (Shipping Mode)
Right now STA supports Small Parcel or Less than or Full Truckload
7. Choose Your Carrier
You can use either partnered or non-partnered.
8. Accept and Confirm
9. Print Your Box Labels
Amazon supports some different formats that will print a PDF for the right labels for you.
Note that if you are not using a partnered carrier you will probably need to create labels for the carrier separately. These labels are just the Amazon labels.
For non-partnered carriers you will also need to enter the tracking number for your boxes.

- Are My Emails Compliant with Amazon Policy? – August 22, 2023
- Amazon AI-Powered Reviews for Sellers: A New Era of Customer Feedback – August 16, 2023
- Amazon Prime Day Opportunities: Unlock Success with Amazon’s Prime Big Deal Days in October 2023 – August 13, 2023